How to Install Transfer Switch on a
Generator: 8 Steps to Follow
A power failure is probably the last thing we want to encounter.
It’s okay; you can install a generator to deal with the power outage before it happens.
We are not through yet!
There’s been a spike in portable generator sales in the past few years. But buying a portable generator and running it in a hurry means bypassing the recommended and essential installation processes.
Besides installing the portable generator, you must mount and install generator transfer switch to make it easier to access. Moreover, get the job done efficiently to make it quickly accessible during a power outage.
Are you thinking of installing a transfer switch yourself? Don’t want to invest dollars in it?
Good News:
We have prepared this step-by-step guide with images to help you in the installation process of a transfer switch for a portable generator. You only need to have some basic knowledge about electrical wires and circuits, and you are good to go.
Let’s walk you through the entire process!
Required Tools:
- Transfer switch
- 50 amp double pull breaker
- Long wires
- Circuits
- Pliers
- Drill
- Wire stripper
Step-by-Step Guide to Install Generator Transfer Switch
The process to install generator transfer switch is not complicated; you need basic knowledge about electrical circuits to perform the task conveniently.
Keep in Mind:
If you don’t have any prior experience with replacing the plugs or switches or don’t know how the circuits, plugs, and wires work, it is better to get a licensed and professional electrician to get the job done.
Let us get you through this step-by-step guide!
Step 1: Mounting the Transfer Switch
- Before shutting off the main power supply of the house, ensure you have done all the electrical work so that when you shut off the main power, you only have to make connections.
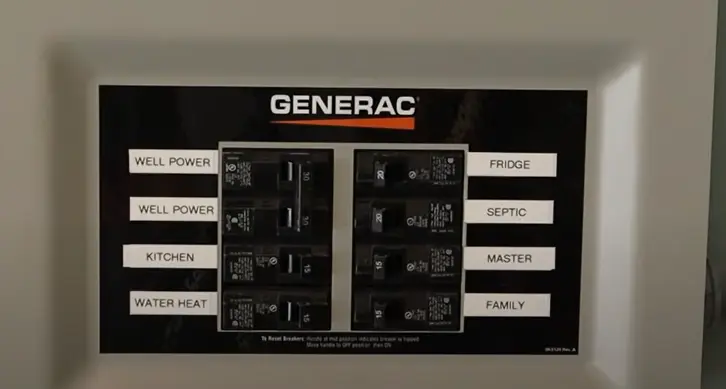
- First of all: Start by mounting the transfer switch near the main electric panel (in this case, we have used a 30 amp transfer switch with 8 circuits)
- You can buy whatever suits you; make sure to mix and match the circuits and switches properly, as they must be compatible. For instance, if you want to transfer a circuit of 20 amp, you must also have a circuit of 20 amp in the transfer panel, not less than that.
Secondly: Install the generator plug away from the panels, preferably outside the house or in the garage, if you follow the safety precautions accurately.
Step 2: Turn off the Main Power Supply

Once you have done the installation processes, power off the main power supply of the house and start switching the wires.
Technically, you transfer one circuit from the main panel to the transfer panel. Pick the electricity levels per requirement depending on what utilities you want in case of a power break.
Since we have switched off the main power supply and chosen which circuit to transfer from the main panel to the transfer switch panel, let us move toward the next installation step.
Step 3: Installation of 50 amp Breaker into the Main Panel

Firstly properly connect the ground (green) and white (neutral) wires from the transfer panel to the main panel on their respective bars. No matter in which order you put the white wires since they are neutral.
Pull all the wires (red, black, and breaker) from the transfer panel to the main electrical panel.

Since you have appropriately understood the wires and connectivity details, pick the circuit to be transferred, and now you have the power to get started. Take your time; no need to rush.
All the wires coming from the transfer switch breakers have different colors, so it is easy for you to identify which wire belongs to which utility in the house.
Moreover, it also makes things convenient if you want to reverse the process. Now, remove the wire from the main panel breaker (which you want to transfer) and connect it with the black wire from the transfer switch.
Keep in mind: If you are pulling out a wire from a 20amp power circuit, you must connect it to the 20amp power circuit; it shouldn’t be less than 20 amp.
Step 4: Installation and Wiring Generator Input Cable

It is always better to mount the generator plug far enough from the house as it is safer. However, if you take enough safety precautions, it can be mounted in your garage (still, it must be away).
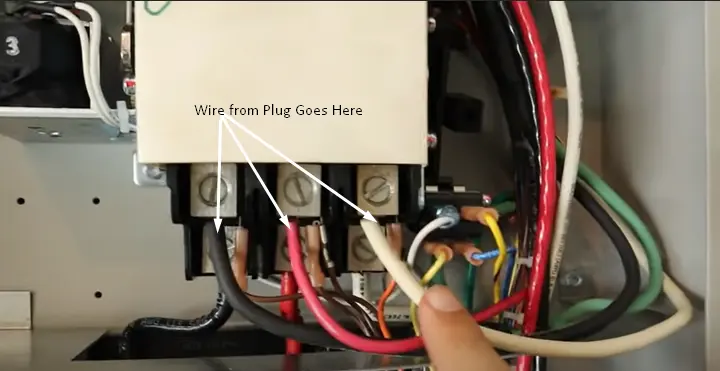
Your generator input cable must be long enough to reach the switch. All 4 wires: green, red, white, and black, should reach the transfer switch to enable a working connection.
Black and red wires are also referred to as the hot wires, which must be connected to the 2 holes designated as X and Y. For white wire, it must be connected with the holes designated as W and the green (ground) wire in the spot designated as G.
All the wires are passed through the transformer and connected to the transfer switch box at their respective places. After all the cables are connected successfully, you can screw in the switch in the box.
Step 5: Generator Wires Coming Into the Transfer Switch Panel
Pull all 4 wires successfully in the generator transfer switch box, screw in red, black, and white cables into each section, and connect the ground wire (green) at the ground bar at the back.
Step 6: Put the Covers Back on Both Panels
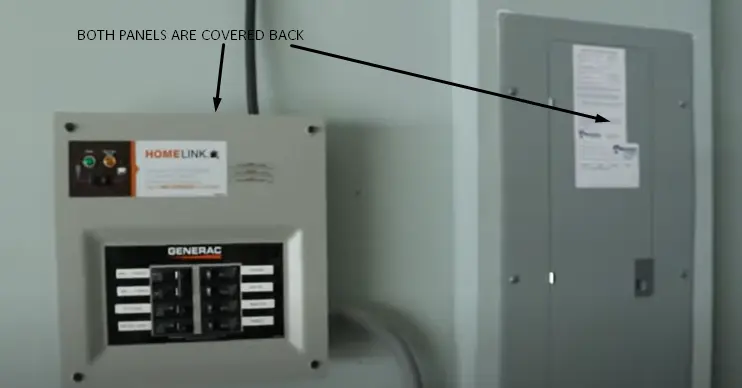
Once everything is hooked up, you will see both lights (generator power and utility) on the transfer switch are off; since both powers are off right now.
Step 7: Verification of Connection
To verify whether the connection is mounted successfully, check the circuit by switching on the generator.
Re-check if all connections and plugs are hooked up properly, and turn on the generator. The generator light on the transfer switch panel will be lit up.
Push the button to shift the house light to generator power. And you will have the lights on with all the breakers turning ‘on.’
Step 8: Now Turn Back the Main Power ON

Once you are sure that the process of installing a transfer switch panel is a success, switch on the main power button.
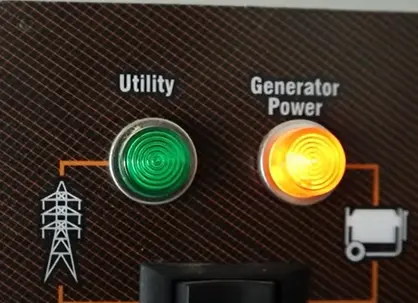
Now you will see both lights lit up on the power switch. Shift the power button from generator power to utility power.
Once you push the utility button, the light will be shut, and power will be transferred to the main power supply. After that, switch off the generator, and eventually, both the lights on the power switch will be shut.
Wrapping Up – Install Generator Transfer Switch
After reading this guide, you can easily install generator transfer switch. These are simple steps that need to be done with care and attention.
Again, if you don’t have any prior experience or doubts about the installation process, it is better to call a skilled electrician to protect yourself from any unforeseen situation or accident.
By and large, installing a transfer switch can be a wise investment to prepare yourself in advance to restore the electricity at your place in case of uninformed power blackouts.
The best part?
These transfer switches come in handy to keep some essential appliances running during a power outage.
[pad]